Creations, construction techniques, and news from the world of plastic toys
Moderators: Dr. X, ikensall, fredde
-
morganm
- Dimmy
- Posts: 635
- Joined: Wed Jul 14, 2010 1:19 pm
- Location: MN
Post
by morganm » Tue Jul 05, 2011 9:23 pm
Here's an example of a technique I'm trying to replicate. Pretty sure I have all the pieces but despite all of my effort I can't figure it out!
http://www.brickshelf.com/cgi-bin/gallery.cgi?f=418188
Lets take the arm for closer examination. In particular it's right arm as we can clearly see the shoulder assembly and the elbow assembly:
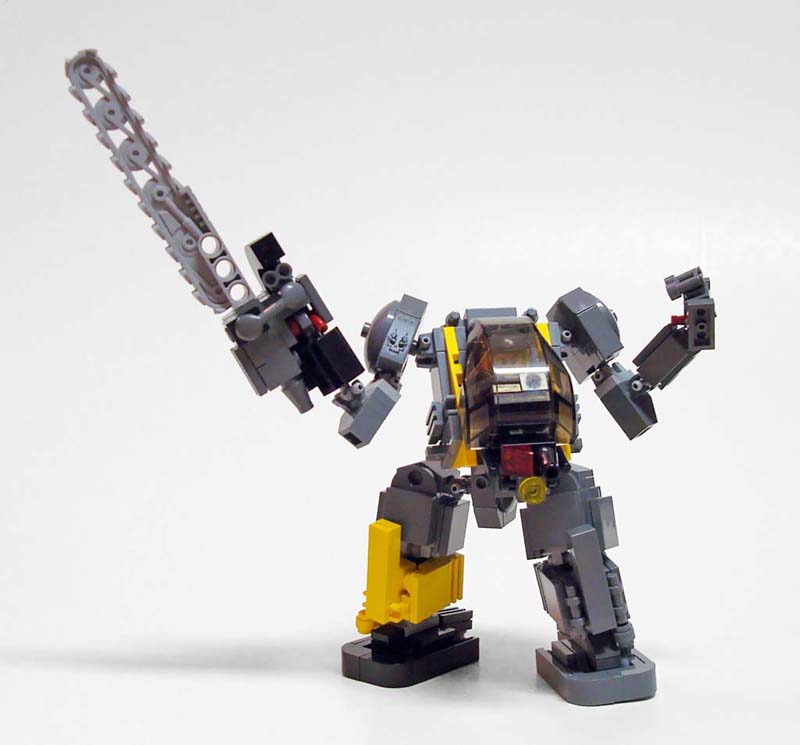
On the cockpit chassis we see the clips holding onto the T pin. The shaft of the T pin goes horizontal into some brick in the arm.... OK, got it.
What I don't get is how to transition from where the T pin interface there is horizontal to now a similar T pin interface vertically in the elbow.
Please enlighten me, thanks!
-
Silent-sigfig
- can you feel me?
- Posts: 2562
- Joined: Fri Mar 14, 2008 5:20 pm
- Location: Number one in USA
Post
by Silent-sigfig » Tue Jul 05, 2011 9:26 pm
headlight bricks
BFenix wrote:Silent-sigfig wrote: 
Coolest 1000th post ever

-
aoffan23
- You can nail me with your wood. ( ͡° ͜ʖ ͡°)
")
- Posts: 2734
- Joined: Sat Jan 23, 2010 7:41 pm
- Location: Ottawa
Post
by aoffan23 » Tue Jul 05, 2011 9:32 pm
What Silent said. You can see the half plate space at the bottom of the shoulder, it's a little rectangular black space. All put together with a 1x3 inverse slope and the plate and cheese at the front.
Tzan wrote:Quantumsurfer wrote:I generally agree with Tzan
Warhead wrote:I agree with QuantumSmurfer.
I agree with Warhead.

-
morganm
- Dimmy
- Posts: 635
- Joined: Wed Jul 14, 2010 1:19 pm
- Location: MN
Post
by morganm » Tue Jul 05, 2011 9:34 pm
That's what I figured but I just don't get it.... please elaborate.
I guess you mean one headlight brick standing vertical with the T pin shaft going into it right? But then how does the horizontal headlight brick interface with the vertical one to allow the vertical T pint shaft to go into the headlight brick?
-
aoffan23
- You can nail me with your wood. ( ͡° ͜ʖ ͡°)
- Posts: 2734
- Joined: Sat Jan 23, 2010 7:41 pm
- Location: Ottawa
Post
by aoffan23 » Tue Jul 05, 2011 9:37 pm

The red things are the SNOT studs on the headlight bricks. You just put one horizontally, one vertically. Not really that hard to figure out.
Tzan wrote:Quantumsurfer wrote:I generally agree with Tzan
Warhead wrote:I agree with QuantumSmurfer.
I agree with Warhead.
-
morganm
- Dimmy
- Posts: 635
- Joined: Wed Jul 14, 2010 1:19 pm
- Location: MN
Post
by morganm » Tue Jul 05, 2011 9:45 pm
What is interlocking the two headlight bricks?
-
Dertyyy
- Hero
- Posts: 90
- Joined: Tue Nov 03, 2009 8:57 am
- Location: right here, right now
Post
by Dertyyy » Tue Jul 05, 2011 9:48 pm
they are on the same plate, just turned 90 degrees. there is no SNOT in the connection of the bricks at all.
You are unique, just like everybody else.
-
aoffan23
- You can nail me with your wood. ( ͡° ͜ʖ ͡°)
- Posts: 2734
- Joined: Sat Jan 23, 2010 7:41 pm
- Location: Ottawa
Post
by aoffan23 » Tue Jul 05, 2011 9:50 pm
aoffan23 wrote:All put together with a 1x3 inverse slope and the plate and cheese at the front.
It's just like Dertyyy said, they're just laid out like plain bricks.
Tzan wrote:Quantumsurfer wrote:I generally agree with Tzan
Warhead wrote:I agree with QuantumSmurfer.
I agree with Warhead.
-
morganm
- Dimmy
- Posts: 635
- Joined: Wed Jul 14, 2010 1:19 pm
- Location: MN
Post
by morganm » Tue Jul 05, 2011 9:52 pm
OOhhhh kay... got it. Thanks guys!
-
Gungnir
- Jaw-Jaw
- Posts: 996
- Joined: Wed Jul 14, 2010 3:01 am
Post
by Gungnir » Wed Jul 06, 2011 1:33 am
What I want to know is: How the hell does everyone get away with such tiny cockpits? Mine are always at least 6 studs wide.
BrikThulhu eats 1d6 minifigs each turn.
-
OneEye589
- Pooplord
- Posts: 3228
- Joined: Sat Jul 19, 2008 6:35 pm
- Location: New York
-
Contact:
Post
by OneEye589 » Wed Jul 06, 2011 10:17 am
Why six studs wide? I usually only make mine 4 studs wide; middle being down for the fig to sit and the outside two raised for the arms to rest on.
-
Robot Monkey
- My Little Pony
- Posts: 1935
- Joined: Tue Nov 02, 2010 8:47 pm
- Location: The Edge
Post
by Robot Monkey » Wed Jul 06, 2011 1:36 pm
OneEye589 wrote:Why six studs wide? I usually only make mine 4 studs wide; middle being down for the fig to sit and the outside two raised for the arms to rest on.
This is what I do.